The Basics of Roof Design: Understanding the Different Types of Roof Structures
When it comes to roof construction, understanding the different types of roof structures is essential. The right roof design not only enhances the aesthetics of a building but also ensures its durability and functionality. In this comprehensive guide, we will provide you with a detailed overview of the basics of roof design.
1. Flat Roof: The flat roof is one of the simplest and most cost-effective types of roof structures. It features a horizontal platform, which makes it easy to install solar panels, HVAC units, or create a rooftop garden. However, proper drainage systems are crucial to prevent water pooling and leakage.
2. Gable Roof: Also known as a pitched or peaked roof, the gable roof is a popular choice due to its classic triangular shape. This design not only allows for efficient water drainage but also provides ample attic space for storage or additional living areas. It is commonly seen in traditional or colonial-style houses.
3. Hip Roof: The hip roof is similar to the gable roof but has slopes on all four sides. This design offers increased stability and is more resistant to strong winds and hurricanes. The additional slopes make it easier for rainwater to drain off, reducing the risk of leaks. Hip roofs are commonly found in Mediterranean or ranch-style homes.
4. Mansard Roof: Commonly associated with French architectural styles, the mansard roof is characterized by its double slope on all four sides. The lower slope is steeper than the upper slope, allowing for additional living or storage space in the attic. This design offers a unique and elegant aesthetic, but it can be more expensive to construct.
5. Gambrel Roof: The gambrel roof is often mistaken for a mansard roof due to its similar structure. However, the gambrel roof has two different slopes on each side, with the lower slope being steeper. This design is commonly seen in barns and colonial-style homes, as it provides ample space for storage or living areas in the attic.
6. Shed Roof: The shed roof, also known as a skillion roof, is a single sloping roof surface that is commonly seen in modern or minimalist architecture. This design is cost-effective and easy to construct, making it a popular choice for small structures such as sheds, garages, or extensions.
These are just a few examples of the different types of roof structures available. Each design has its advantages and considerations, including aesthetic appeal, resistance to weather conditions, and cost. When choosing a roof design, it is important to consider the specific needs and style of the building, as well as consulting with a professional architect or contractor.
Understanding the basics of roof design is crucial for anyone involved in roof construction. By familiarizing yourself with the various types of roof structures, you can make informed decisions that will ensure the durability, functionality, and visual appeal of your building.
Materials Matter: A Guide to Choosing the Right Roofing Materials for Your Construction Project
When it comes to constructing a roof for your building, one of the most important decisions you’ll have to make is choosing the right roofing materials. The materials you select will not only affect the aesthetics of your roof but also its durability, energy efficiency, and overall performance. With so many options available in the market, it can be overwhelming to decide which materials to use for your construction project. In this guide, we’ll walk you through the different roofing materials commonly used today and help you make an informed decision.
1. Asphalt Shingles
Asphalt shingles are the most popular choice for residential roofing due to their affordability, ease of installation, and wide variety of colors and styles. Made from fiberglass or organic materials coated with asphalt, these shingles are lightweight, durable, and can withstand various weather conditions. However, they may not be the most environmentally friendly option and tend to have a shorter lifespan compared to other materials.
2. Metal Roofing
Metal roofing has gained popularity in recent years due to its durability, energy efficiency, and modern aesthetics. It can be made from steel, aluminum, copper, or zinc, offering a wide range of style options. Metal roofs are fire-resistant, lightweight, and require minimal maintenance. They can also be recycled, making them a sustainable choice. However, metal roofing tends to be more expensive upfront and may require professional installation.
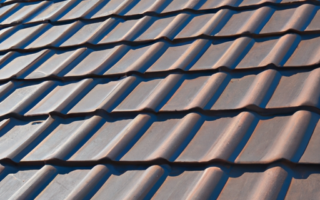
3. Clay or Concrete Tiles
Clay or concrete tiles are known for their distinctive appearance and longevity. These tiles are highly durable, fire-resistant, and can withstand extreme weather conditions. They are also energy efficient, keeping your building cool in hot climates. However, clay and concrete tiles are heavy, necessitating a strong support structure. They also require professional installation and tend to be more expensive compared to other materials.
4. Slate
Slate is a natural stone material that offers a high-end, elegant look to any building. It is known for its exceptional durability and can last for over a century with proper maintenance. Slate is fire-resistant, waterproof, and resistant to mold and fungi. It is also eco-friendly as it is a natural product and can be recycled. However, slate roofing is expensive and requires professional installation due to its weight and delicate nature.
5. Wood Shingles or Shakes
Wood shingles or shakes are a traditional roofing material that adds a rustic charm to any building. They are usually made from cedar, redwood, or pine and are known for their natural beauty. Wood roofing provides excellent insulation and is environmentally friendly. However, it requires regular maintenance, is susceptible to rot, fire, and insect damage, and may have restrictions in some areas due to fire codes.
Choosing the right roofing materials for your construction project is crucial for the overall performance and longevity of your roof. Consider factors such as cost, durability, aesthetics, energy efficiency, and maintenance requirements when making your decision. Consulting with a professional roofing contractor can also help you navigate through the options and select the best materials for your specific needs.
Step-by-Step Guide to Roof Installation: From Preparations to Finishing Touches
When it comes to roof construction, the installation process is a crucial step that requires careful planning and execution. In this step-by-step guide, we will take you through the entire process of roof installation, from the preparations to the finishing touches.
Step 1: Preparations
Before you begin the installation, it’s important to make necessary preparations. Start by ensuring that you have all the required materials and tools on site. This includes roofing materials such as shingles, underlayment, and flashing, as well as tools like hammers, nails, and roofing adhesive.
Additionally, you should inspect the existing roof structure to identify any underlying issues that need to be addressed before installation. This may include fixing leaks, replacing damaged plywood, or reinforcing weak spots.
Step 2: Installing Underlayment
The next step is to install the underlayment, which is a waterproof barrier that provides an extra layer of protection against water intrusion. Begin by rolling out the underlayment horizontally, starting from the eaves and working your way up. Secure it in place using roofing nails or staples, ensuring there are no gaps between the overlapping sheets.
Step 3: Adding Flashing
Flashing is used to prevent water from seeping into vulnerable areas such as roof valleys, chimneys, and skylights. Install flashing by placing it over the underlayment and securing it in place with roofing adhesive or nails. Be sure to mold the flashing to fit snugly around any protrusions and overlap the pieces to create a watertight seal.
Step 4: Installing Shingles
Now it’s time to install the shingles, which will serve as the protective outer layer of the roof. Start from the bottom edge of the roof and work your way up, laying each shingle in a staggered pattern. Secure them in place with roofing nails, making sure to follow the manufacturer’s recommended placement and spacing.
Trim the shingles as necessary to fit around vents, chimneys, or other obstacles. Additionally, keep in mind the local building codes and climate conditions when selecting the appropriate shingle type and installation method.
Step 5: Finishing Touches
Once you have installed all the shingles, it’s time for the finishing touches. This includes installing ridge caps along the ridges of the roof to provide added protection and a finished look. Secure the ridge caps with roofing nails or adhesive, making sure to overlap the edges properly.
Finally, perform a thorough inspection to ensure that all the shingles are securely fastened, the flashing is properly installed, and there are no visible defects or damage. Clean up any debris or waste materials, and your roof installation is complete!
Following this step-by-step guide will help you ensure a quality roof installation that will provide long-lasting protection for your home. Remember to prioritize safety precautions throughout the process and consult with professionals if needed.
Ensuring Longevity: Tips and Tricks for Proper Roof Maintenance and Repair
Proper roof maintenance and repair are crucial elements in ensuring the longevity of your roof. While a well-constructed roof is designed to withstand various weather conditions and other external factors, regular upkeep is essential to prevent costly damages and extend its lifespan. In this comprehensive guide to roof construction, we will discuss some tips and tricks for proper roof maintenance and repair.
One of the most important aspects of roof maintenance is regular inspection. It is recommended to inspect your roof at least twice a year, in the spring and fall, and after any severe weather event. During the inspection, check for any missing, broken, or damaged shingles. Pay attention to the flashing around chimneys, vents, and skylights, as well as any signs of leaks or water damage.
Trimming overhanging tree branches is another essential maintenance task. Branches that come into contact with your roof can scratch the surface, loosen shingles, and create entry points for water. By keeping the branches trimmed, you can reduce the risk of roof damage and minimize the accumulation of debris such as leaves and twigs.
Regularly cleaning your roof is also vital for its longevity. Remove any debris, such as leaves, branches, and dirt, as they can trap moisture and accelerate the deterioration of your roof. However, it is important to exercise caution during the cleaning process to avoid causing any damage to the shingles or protective coatings.
Proper attic insulation and ventilation play a significant role in roof maintenance as well. Inadequate insulation can lead to ice dams in colder climates, which can cause water to seep under the shingles and damage the roof structure. Good ventilation helps to regulate temperature and moisture levels, preventing the buildup of condensation and mold.
When it comes to roof repair, it is essential to address any issues promptly. Small leaks or damaged shingles may seem insignificant, but if left unattended, they can escalate into more significant problems over time. Whether you have the expertise to perform the repairs yourself or need to hire a professional, addressing even minor damages can help you avoid more costly repairs in the future.
In conclusion, proper roof maintenance and repair are crucial for ensuring the longevity of your roof. By conducting regular inspections, trimming overhanging tree branches, cleaning your roof, and maintaining proper attic insulation and ventilation, you can safeguard your investment and avoid costly damages. Remember, addressing any repairs promptly is key to preventing minor issues from becoming major problems. By following these tips and tricks, you can extend the lifespan of your roof and enjoy its protection for many years to come.